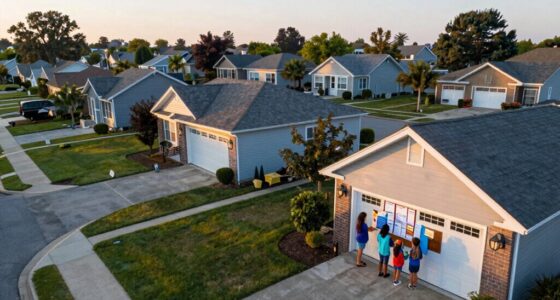

To catch the most evidence, place cameras at key spots like entry and exit points, driveways, and high-traffic hallways. Focus on capturing faces and license plates by mounting cameras at eye level and proper angles. Cover blind spots behind fences, corners, and dark areas with strategic positions. Guarantee good lighting and avoid glare or shadows. Interested in making your setup unstoppable? Keep exploring for detailed placement tips to maximize your security.
Key Takeaways
- Position cameras at entry points like doors and windows to capture potential intruders and gather vital evidence.
- Cover high-traffic areas such as hallways and driveways to monitor movement and prevent blind spots.
- Place cameras at strategic heights and angles to maximize facial detail and overall visibility.
- Use lighting considerations to avoid glare, shadows, and overexposure, ensuring clear footage around critical zones.
- Analyze the property thoroughly to identify and cover overlooked corners, pathways, and vulnerable areas.

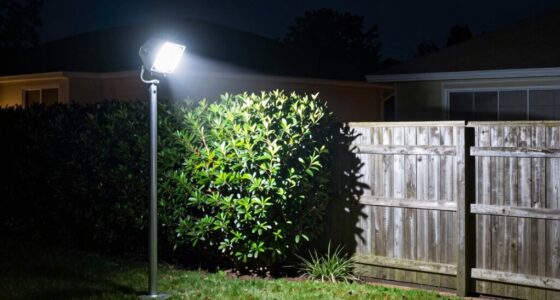
Proper security camera placement is essential for maximizing your surveillance system’s effectiveness. When positioning your cameras, you need to consider how lighting angles affect visibility. Bright lighting can cause glare or shadows that obscure important details, so aim for angles that minimize these issues. Position cameras where they can capture clear images regardless of the time of day, avoiding direct sunlight that might wash out footage or create glare. Proper lighting angles help ensure that faces, license plates, and other critical details remain visible and identifiable. Equally important is the elimination of blind spots—areas your cameras can’t see. These are often the weakest points in your security setup, providing intruders or vandals a chance to go unnoticed. To prevent this, you should analyze your property thoroughly, noting any corners, entrances, or pathways that might be overlooked. Strategically placing cameras at entry points, corners, and high-traffic areas reduces blind spots significantly.
When you’re installing cameras, think about the natural and artificial lighting in each location. For example, placing a camera facing a window during the day might result in backlighting, making it hard to see faces or objects clearly. Conversely, installing cameras too close to bright lights can cause overexposure, losing vital details. Adjusting the position or adding shades can help balance the lighting, ensuring footage remains sharp. You also want to avoid placing cameras where shadows fall across important zones, as shadows can distort images and obscure faces or activities. Take advantage of the natural lighting angles to highlight key areas, ensuring that the camera’s view remains consistent and clear during different times of the day.
Additionally, understanding how lighting angles affect visibility can significantly improve your camera coverage and evidence quality. Another common mistake is overlooking the importance of camera height and angle. Positioning cameras too high might prevent capturing facial features, while too low can make footage less secure if someone tampering with the device. Find a height that offers a broad view while maintaining the ability to capture detailed images. When you consider lighting angles and blind spots during installation, you’re actively reducing vulnerabilities in your security system. Proper placement not only enhances image quality but also ensures that your cameras cover the most critical zones without gaps. In doing so, you create a thorough surveillance network that’s more likely to catch evidence when it counts, giving you peace of mind and a more secure property.

2026 Enhanced 2K UHD Security Cameras Wireless Outdoor – Free Cloud & SD Storage, Dual-Band WiFi 2.4G/5G, Full-Color Night Vision, 6-Month Battery, Motion Alerts, IP66 Weatherproof, 2-Way Talk
📌【Why Choose Us?】 Millions of families trust realhide for hassle-free, reliable home security. From easy setup to long-lasting…
As an affiliate, we earn on qualifying purchases.
As an affiliate, we earn on qualifying purchases.
Frequently Asked Questions
How Do Lighting Conditions Affect Camera Visibility?
Lighting conditions critically impact your camera’s visibility. Bright lighting glare can cause overexposure, making it hard to see details, while poor lighting leads to shadow concealment, obscuring important evidence. You should position cameras where they’re not directly facing strong light sources and use lighting adjustments or supplemental lights to balance the environment. Proper lighting guarantees clear footage, helping you capture vital evidence without distortion or concealment.
What Is the Ideal Height for Camera Installation?
You should install your camera at an ideal height of about 8 to 10 feet for the best coverage. This height is high enough to prevent tampering but low enough to capture clear details. Proper camera height ensures maximum evidence collection, making it nearly impossible for intruders to avoid detection. Focus on the camera height to achieve the perfect vantage point, turning your security setup into an impenetrable fortress.
How Do Weather Elements Impact Camera Performance?
Weather impact can considerably affect your security camera’s performance, especially with environmental factors like rain, snow, fog, and extreme temperatures. Rain and snow can obscure the lens, reducing visibility, while fog can limit clarity. Cold weather may cause condensation inside the housing, and heat can lead to overheating. To minimize these issues, choose cameras with weatherproof ratings, proper enclosures, and consider placement that shields them from harsh elements.
Are There Legal Restrictions on Camera Placement?
You should know that around 80% of states have privacy laws affecting camera placement. Legally, you can’t infringe on others’ privacy or violate property rights. You’re restricted from pointing cameras where they invade neighbors’ homes or private spaces without permission. Always check local laws to guarantee your security cameras comply, and avoid legal trouble. Respecting privacy laws protects your rights and keeps your surveillance practices lawful.
How Can I Prevent Camera Vandalism?
To prevent camera vandalism, you should install vandal deterrents like protective covers or enclosures and position cameras out of easy reach. Use tamper-proof screws and lock boxes to secure your equipment, making camera tampering more difficult. Additionally, place signs warning of surveillance, which acts as a deterrent. Regularly check and maintain cameras to spot signs of vandalism early, ensuring your security system stays effective and intact.
2026 Enhanced 2K UHD Security Cameras Wireless Outdoor – Free Cloud & SD Storage, Dual-Band WiFi 2.4G/5G, Full-Color Night Vision, 6-Month Battery, Motion Alerts, IP66 Weatherproof, 2-Way Talk
📌【Why Choose Us?】 Millions of families trust realhide for hassle-free, reliable home security. From easy setup to long-lasting…
As an affiliate, we earn on qualifying purchases.
As an affiliate, we earn on qualifying purchases.
Conclusion
By strategically placing your security cameras in these nine key spots, you’ll maximize evidence collection and keep your property safe. Think of it like having a watchful sentinel atop the Great Wall—nothing slips by unnoticed. Don’t leave gaps or blind spots; instead, be proactive and vigilant. Remember, even the most advanced tech can’t replace good placement. So, take action now, or you’ll be left in the dark—like a knight without his torch in the dark ages.

ANSQUE Security Cameras Wireless Outdoor Home System, 4 Camera Kit, No Subscription Fees, Solar Powered, Local Storage, 365-Day Battery Life, 360°PTZ Surveillance, Auto Tracking, 2K Color Night Vision
No Subscription Fees, Secure Local Storage: AnsqueBase features built-in 32GB local storage with up to 120 days of…
As an affiliate, we earn on qualifying purchases.
As an affiliate, we earn on qualifying purchases.

ANNKE 4MP ANPR IR Varifocal Bullet Network Camera, Face Capture, License Plate Recognition, People Counting, Line Crossing Detection, 120dB WDR, NEMA 4X Anti-Corrosion, Metal housing, IK10, IP67
4MP Ultra-Clear Imaging & Embedded ANPR:Experience superior detail with 4MP high-resolution video. This camera is engineered with embedded…
As an affiliate, we earn on qualifying purchases.
As an affiliate, we earn on qualifying purchases.