
TL;DR
Moving your rig into a closet can drastically reduce noise, but it requires careful placement, sealing gaps, and proper ventilation. The most effective noise control combines distance, barriers, and absorption, not just foam or blankets.
Ever wondered if you can turn a tiny closet into a quiet, professional-grade studio? The answer is yes — with some strategic tweaks. Most folks focus on foam and absorption, but the real game-changer is putting distance between you and the noise source.
In this guide, you’ll learn how to dampen sound intelligently, position your gear, and prevent heat build-up. Whether you’re recording vocals or running a high-powered AI rig, these tips will help you keep noise out and airflow in.
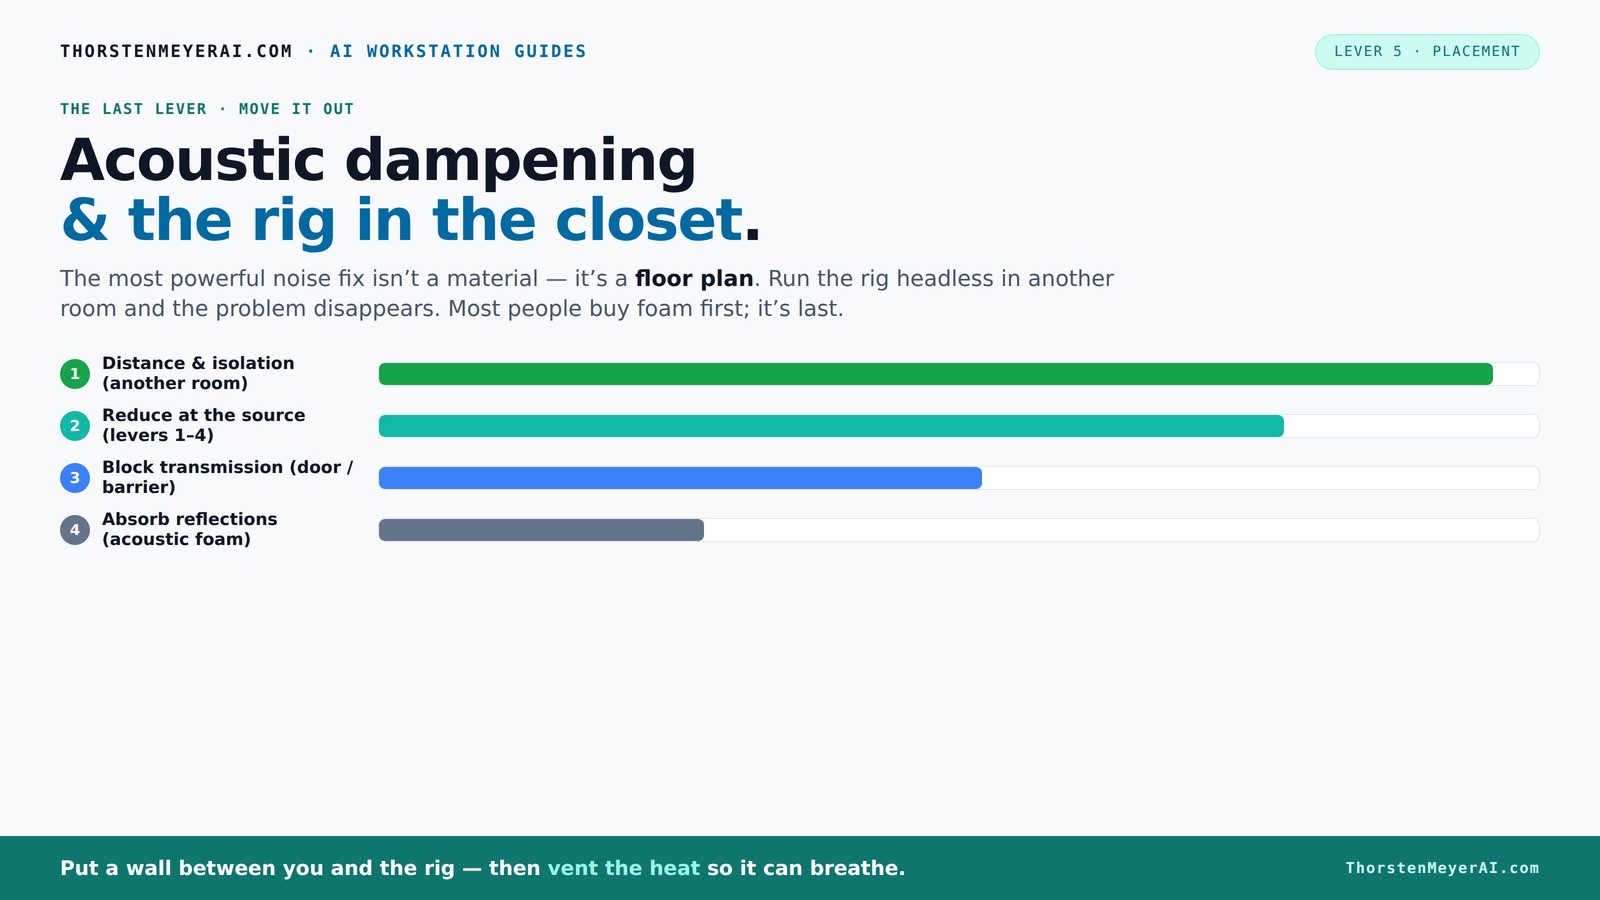
Acoustic dampening
& the rig in the closet.
The most powerful noise fix isn’t a material — it’s a floor plan. A rig you can’t hear because it’s in another room beats any amount of foam. Tap the approaches in Part 1 to see what actually works.
(another room)
(levers 1–4)
(door / barrier)
(acoustic foam)
Contain the noise, not the heat
Key Takeaways
- Distance from your rig dramatically reduces noise — consider placing it in another room or closet.
- Proper ventilation is essential; sealed closets trap heat, risking damage and throttling.
- Treat reflection points with thick absorption panels, especially on walls, ceiling, and door gaps.
- Bass trapping in corners improves sound clarity and reduces muddiness in small spaces.
- Microphone choice matters: dynamic mics handle room reflections and noise better in DIY closets.
Focusound Acoustic Panels 24 Pack 2"x12"x12" with 120 PCS Double-Side Adhesive - Sound Proof Pyramid Foam for Walls, Home Studio Noise Absorption & Echo Control Kit
STRESS-FREE INSTALL: NO HOLES, NO RESIDUE! - Install & Remove Stress-Free with 120 reusable adhesive squares – cleans...
As an affiliate, we earn on qualifying purchases.
As an affiliate, we earn on qualifying purchases.
Why Moving Your Rig Is the Best Noise Fix You Can Do
The simplest way to cut noise is to put physical distance between your rig and your workspace. A rig in another room, or even in a closet on the other side of a wall, can be virtually silent from your desk.
Think of it like a garden hose: if you turn the tap on full blast and hold it close, it’s loud. But if you run that hose across the yard and turn on the tap, the sound diminishes dramatically at your position. Same with noise from a powerful GPU or AI server.
This approach is especially smart for AI workloads, which often involve headless servers. You don’t need to sit next to the machine, so why not put it somewhere quiet? Just make sure you have a wired network and proper ventilation.

Focusound 52 Pack Acoustic Foam Panels 1" x 12" x 12" Sound Proof Foam Panles Soundproofing Noise Cancelling Wedge Panels for Home Office Recoding Studio with 300PCS Double-Side Adhesive
Soundproofing - Acoustic foam panels triangular grooves structure for better noise absorption, helps to reduce and absorb unwanted...
As an affiliate, we earn on qualifying purchases.
As an affiliate, we earn on qualifying purchases.
The 'Rig in the Closet' Setup — How to Do It Right and Avoid Overheating
Placing a high-heat, high-noise machine in a closet sounds perfect — until it isn’t. The trap? Trapped heat. A sealed space can turn your rig into a toaster if you don’t plan ventilation.
To keep your system cool, you need active airflow: a vent opening, an exhaust fan, or even ducted cooling. Some DIY setups throw in a simple passive vent, while more advanced solutions use temperature-controlled exhaust fans that kick on when needed. For example, a small, quiet fan pulling hot air out keeps temperatures safe and noise low. For more detailed ideas, check out the heat and noise reduction guide.
Built-in cooling solutions like liquid cooling radiators that vent outside can help, too. They move heat out of the closet, preventing overheating and throttling, which makes noise worse. Proper ventilation not only maintains optimal system performance but also prevents heat-induced hardware failures. For more detailed ideas, check out the heat and noise reduction guide.

118” Wedge-Shape Foam Window Weather Stripping Door Seal Strip,Soundproofing Frame Winter Insulation Tape for Exterior Front Door,Noise Cancelling Window Inserts,Door Gap Filler Light Blocker,White
Upgraded Wedge Design: This window draft stopper features an upgraded wedge design, tapering from 5/32" to 11/32" (0.16"–0.35")...
As an affiliate, we earn on qualifying purchases.
As an affiliate, we earn on qualifying purchases.
How to Treat the Closet for Sound Without Turning It Into a Soundproof Fortress
Acoustic dampening in a small closet isn’t about making it soundproof — it’s about controlling reflections. Think of your closet as a tiny echo chamber. Without treatment, sound waves bounce off the parallel surfaces, creating muddiness and reverb that can ruin recordings or make monitoring difficult.
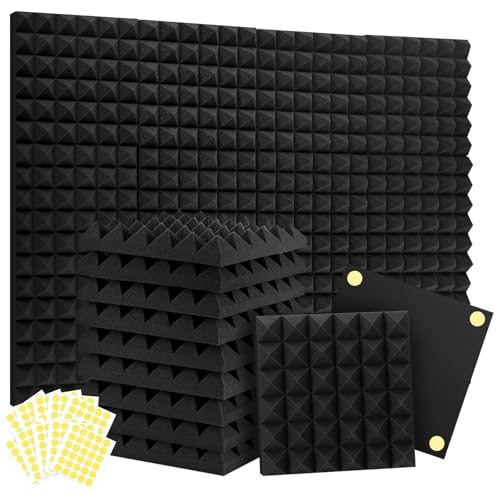
Start by treating the first reflection points: the wall behind your mic, the ceiling above, and the side walls. Using thick foam panels, blankets, or DIY solutions like moving blankets hung with curtain rods helps absorb these early reflections, which are critical because they directly affect how your microphone picks up sound. Cover around 20-30% of the wall space to significantly reduce echo and reverb, but for more ideas, see the soundproofing overview.
Sealing gaps around the door is vital. Even small cracks can let in unwanted noise and cause reflections to bounce unpredictably. Use weatherstripping or hang heavy blankets over the door, overlapping foam around the edges. Bass traps placed in corners are essential for controlling low-frequency buildup—an often overlooked source of muddiness. These traps absorb the deep, resonant bass that tends to accumulate in small, enclosed spaces, preventing the sound from becoming boomy or muddy.
Remember: treating the space inside is about reducing reverb and controlling reflections, which enhances the accuracy of your recordings and monitoring. For detailed treatment ideas, see the soundproofing overview.

TroyStudio Portable Sound Proof Box, 16" x 12" x 16.2" Noise Reduction Enclosure, Light Blocking Quiet Cover, Soundproof Barrier for Ultrasonic Cleaner, Air Pump, Rock Tumbler & Generator
【DIMENSIONS & COMPONENTS】: Exterior dimensions: 16"L x 12"W x 16.2"H; Interior space: 12"L x 8"W x 14.2"H; Foldable...
As an affiliate, we earn on qualifying purchases.
As an affiliate, we earn on qualifying purchases.
Placement Tips for Gear, Mic, and Cables in a Tight Closet Space
In a small closet, every inch counts. Position your microphone at head height, ideally on a boom arm or stand that isolates it from vibrations. Keep your gear on a sturdy shelf or desk, away from walls where reflections bounce. For tips on gear placement, see the homepage of one2crypto.com.
Use cable management to avoid clutter that can cause unwanted noise or accidental disconnections. Velcro straps and cable clips keep things tidy. For power, a surge protector with enough outlets is essential; a dedicated circuit helps prevent voltage dips that can cause system instability.
Finally, elevate your equipment slightly off the floor using rubber feet or pads. This reduces vibrations and foot noise that can leak into your recordings.
Are Bass Traps Necessary in a Closet Studio? When and Why
Bass traps are often overlooked but can be a game-changer in small, parallel-walled spaces like closets. They absorb low frequencies that tend to build up in corners, creating a boomy, muddy sound. For more on acoustic treatment, visit goldiramarkets.com.
If you notice your recordings sound hollow or your voice booms back at you, bass trapping can help. Use 4-inch thick panels or DIY solutions like rockwool stuffed into corners. Position them in the most problematic spots, usually where two walls meet.
In a tiny space, controlling low-end is as critical as handling reflections. Without bass traps, your recordings might sound less professional, no matter how much foam you add elsewhere. They help achieve a balanced sound profile, ensuring clarity and fidelity in your recordings and monitoring.
Budget DIY Solutions for a Quiet, Functional Closet Studio
You don’t need to spend a fortune to make a closet into a decent studio. Start with thick blankets, moving blankets, or even old quilts hung around the space. Use foam panels or egg crate foam on the first reflection points—these are cheap and effective. For more ideas, check out the online income strategies.
Seal gaps with weatherstripping or draft tape around the door. Place a rug or carpet on the floor to absorb foot noise and reduce reflections.
For the mic, a dynamic microphone can handle a noisy environment better than a condenser. Mount it on a shock mount to cut down vibrations. Cable management and simple ventilation fans are cheap but vital for safety and performance.
Check out the heat and noise tips for more ideas on cooling and airflow in DIY setups.
Frequently Asked Questions
What is the difference between acoustic treatment, dampening, and soundproofing?
Acoustic treatment reduces echo and reflections within a space, making it sound clearer. Dampening absorbs sound waves to lessen reverb, while soundproofing blocks sound from entering or leaving a room. They target different issues but often work together for the best results.
Where should foam or panels be placed in a closet studio?
Start by treating the first reflection points: behind the mic, the ceiling above, and side walls. Focus on absorbing sound where it bounces directly into your mic. Seal gaps around the door to prevent sound leaks, and add bass traps in corners if low-end buildup is an issue.
Do I need to treat the door, and how?
Yes, the door is often the weakest link in soundproofing. Hang thick blankets or moving blankets over the door, overlapping foam panels around the edges, and seal cracks with weatherstripping or draft tape. These steps significantly cut sound leaks.
How much treatment is enough for a small closet?
Cover about 20-30% of the wall surface with thick panels, focusing on reflection points and corners. Adding bass traps in corners will improve low-frequency control. The goal is to reduce echo and muddiness rather than full soundproofing.
Are bass traps necessary in a closet booth?
In small, parallel-walled spaces like closets, bass traps are highly recommended. They absorb low-frequency buildup that can muddy recordings. Position them in corners where low-end tends to resonate most.
Conclusion
Turning a closet into a quiet studio isn’t about sealing it up tight — it’s about smart placement, thoughtful treatment, and good ventilation. When done right, your noisy AI rig or recording space can become a silent partner in your creative or technical work.
Remember: the goal isn’t perfection, but a usable, manageable environment. With a little effort, your closet can serve as a surprisingly professional hub for your projects. Now, go make that space work for you — quiet, cool, and ready for action.